
Origami Folds


Understanding Diagrams

1. Valley Fold -----------
The most basic of all origami folds is the valley fold. The valley fold gets its name because it makes the paper sink down like a river valley.
In an traditional origami diagram, a valley fold is indicated with dashed lines.
To make a valley fold, simply fold part of the paper towards you and crease along the dashed line.
Sometimes, you are asked to fold and unfold the paper after you make a valley fold. This is called pre-creasing. When you make a pre-crease, you are setting the stage for later steps in the diagram. Pre-creases are made at the beginning of the process because it would be too difficult to put them into place accurately at a later time.
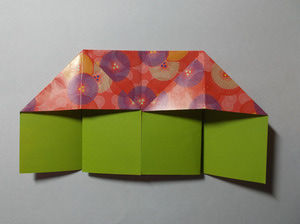
In the photo to the left, you can see several valley folds made to begin an origami box.
2. Mountain Fold _._._._._._._._.
The mountain fold is essentially a valley fold in reverse. A mountain fold gets its name because it makes the paper rise up like a mountain.
In traditional origami diagrams, a mountain fold is indicated by a line made of dashes and dots. Sometimes, there will also be an arrow that indicates the folding direction.
To make a mountain fold, fold part of the paper away from you and then crease along the line. You can do this by holding the paper in the air and folding it. However, it is easier to turn the paper over, fold a valley fold, and then turn the paper back to the original position.
As with a valley fold, you are sometimes asked to fold and unfold the paper to create a precrease that will be used later on in the process of completing a particular model.
In the photo to the left, notice how the creases that form a cross appear to rise up from the paper. These creases are the mountain folds.
3. Squash Fold
After mastering the valley fold and the mountain fold, the beginning origami enthusiast needs to understand how to make a squash fold.
The squash fold is essentially a neat way of "squashing" your paper into position. It is a compound fold that is a combination of creases that are more or less performed simultaneously. After precreasing the model, you collapse it into the shape that is show in the next photo or diagram in the instructions you are following. Two layers of paper are opened up from a central point.
It is very important to look at your specific design instructions to get a feel for the correct placement of the paper during a squash fold. Some, but not all, squash folds are symmetrical. Making a squash fold that is symmetrical when it is supposed to be off towards the left side of the model will through off all of the other steps in your project.
Once you know how to make a squash fold, you can create a variety of origami models, ranging from flowers to animals.
4. Reverse Fold
Fold reverse of previous fold.
Dashed lines show valley folds. This means that the paper is folded in front of itself.
Dashed lines combined with dotted lines show mountain folds. Depending upon what diagramming convention the author is using, you'll find either one dot per dash or two dots per dash. In a mountain fold, the paper is folded back behind itself, usually by turning the paper over, folding a valley fold and then turning the paper back again.
A dotted line, sometimes called an x-ray line, shows a fold that you wouldn't actually be able to see when you were making the model for real. It is used in more advanced origami project diagrams to make the instructions clearer.
Solid lines are cut lines.
Arrows in origami diagrams generally are used to indicate the direction in which you are folding the paper.
An arrow with a loop in it means to turn the paper over.
An arrow drawn to look like a circle with a notation such as 45°, 90°, or 180° means to turn the whole model by the specified amount in the direction that the arrow is pointing.
An arrow that starts off small and gets bigger at the head means that the part of the diagram is being enlarged to make it easier for you to see what the next step in the model should be. If the arrow starts off large and gets smaller at the head, this means that the scale of the diagram is going to decrease. If only part of the model was displayed until now, it will be displayed fully again.
If you see an arrow with horizontal lines through it at the top, this means to repeat the steps. One line means to repeat once, two means to repeat twice, and so on. The repeat arrow was created by Robert Harbin and is mostly used in British diagrams. Occasionally, the repeat arrow will be accompanied by numbers, such as 3-5 or 4-7. This means that you are supposed to repeat this series of steps before moving on to the next part of the model.
Precrease
To precrease the paper means to make a crease, then unfold it. Precreasing is usually done in the first steps to help prepare the paper for the more complicated folds that are to come.
Wet Folding Technique
This technique involves slightly dampening the paper before making a fold. Wet-folding allows the paper to be manipulated more easily, resulting in finished origami models that have a rounder and more sculpted look.